
路由中切换页面和携带参数的方式:
<router-link :to="{name:'test', params: { userId: 123 }}">以命名跳转到test并带post参数</router-link>
<router-link :to="{path:'/test', query: { xxx: 'ooo' }}">以路径跳转到test并带get参数</router-link>
<!-- this.$router.push({ name:'router1',params: { id: status ,id2: status3},query: { queryId: status2 }});
编程跳转写在一个函数里面,通过click等方法来触发;接收参数则用 this.$route.query.name 和
this.$route.params.name,注意 $router 和 $route 的区别。 -->
路由中子页获取参数的方式:
传进来参数:
params:{{$route.params}}
query:{{$route.query}}
<router-link to="/">返回HelloWorld</router-link>
事件和对应js函数的写法:
<button @click="showCon('你好啊。。。')">chrome控制台里输出内容</button>
<script>
export default {
name: 'test',
data () {
return {
msg: '这是切换页面用的测试!'
}
},
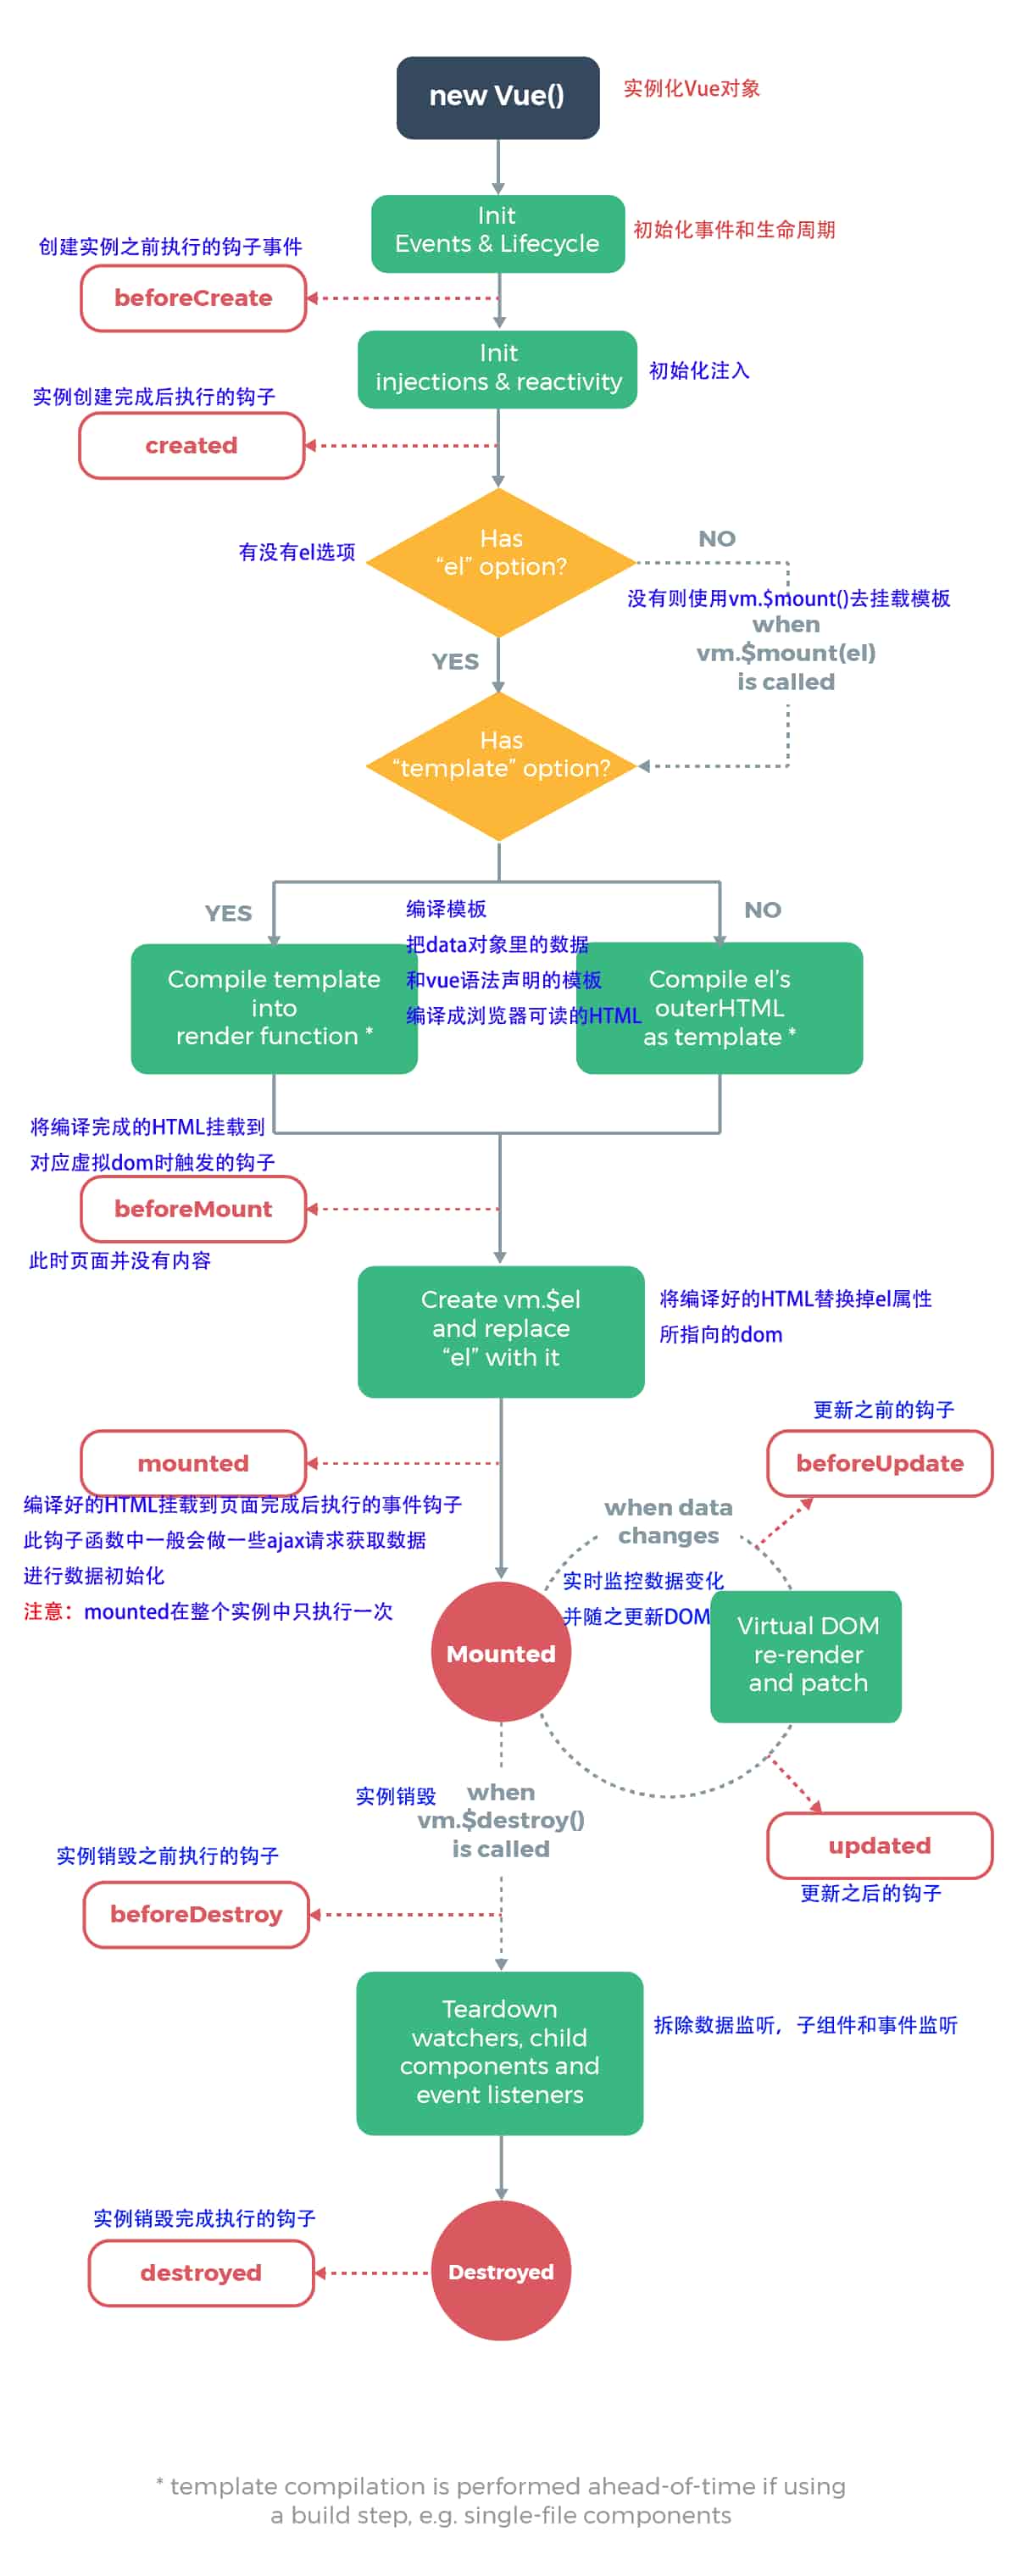
mounted(){ //这个和created一样,执行一次,但这个是在网页加载完成后执行,参考生命周期示意图
//在chrome控制台输出参数
console.log(this.$route.params);
console.log(this.$route.query);
},
methods:{ //这个主要拿来写js函数,比如ajax请求一类的
showCon:function(str){
if(str!=''){
console.log(this.msg //取页面中的其它变量
+'|'+str);
}
}
}
}
</script>
注意:methods中可以带$event参数,传递鼠标点击的事件和属性,写法如showCon('你好',$event)
ajax请求示例:
<button @click="send">发送AJAX请求</button>
注意:以下函数是在methods块里面
send(){
axios({
method:'get',
url:'/', //直接请求一下首页内容吧
}).then(function(resp){
console.log(resp.data);
}).catch(resp => {
console.log('请求失败:'+resp.status+','+resp.statusText);
});
}
跨域调用接口的解决方法:
打开 config/index.js
找到 proxyTable:{}, 改为
proxyTable: {
'/api': {
target: 'http://localhost:8833/www/', //设置调用接口域名和端口号别忘了加http
changeOrigin: true,
pathRewrite: {
'^/api': '/' //这里理解成用‘/api’代替target里面的地址,组件中我们调接口时直接用/api代替
// 比如我要调用'http://0.0:8080/user/add',直接写‘/api/user/add’即可 代理后地址栏显示/
}
}
},
然后就可以在js里使用 /api/test.api 这种地址了,比如:
test(){
axios({
method:'get',
url:'/api/test.api',
}).then(function(resp){
console.log(resp.data);
}).catch(resp => {
console.log(resp);
});
}
vue生命周期示意图:
最后,附非vue-cli模式的,直接引用js的另一种方式代码:
<!DOCTYPE html>
<html>
<head>
<meta charset="UTF-8">
<!-- import CSS -->
<link rel="stylesheet" href="https://unpkg.com/element-ui/lib/theme-chalk/index.css">
</head>
<body>
<div id="app">
<el-button @click="visible = true">Button</el-button>
<el-dialog :visible.sync="visible" title="Hello world">
<p>Try Element</p>
</el-dialog>
</div>
</body>
<!-- import Vue before Element -->
<script src="https://unpkg.com/vue/dist/vue.js"></script>
<!-- import JavaScript -->
<script src="https://unpkg.com/element-ui/lib/index.js"></script>
<script>
new Vue({
el: '#app',
data: function() {
return { visible: false }
}
})
</script>
</html>